What is Toilet Rough In Size? A Proper Info And Guide.
Here, you’ll learn what is toilet rough in size. Between your new toilet and any sources of water, a rough-in is essential when installing anything that requires access or contact such as pipes –
it ensures there is enough space cross to install them properly without bumping into other fixtures in tight quarters. This can be a tricky task for those not familiar with plumbing terminology!
But you can do it yourself by reading this article and following some easy steps that are we writing below. But in the first case, it is better to have it done by one skilled person.
However, let’s explore it with us!
What Is a Toilet Rough-In?

A toilet rough-in is the location where your water line goes, typically. You can find it in some cases if you have a wall-mounted vanity and not an open style one like we’ll be discussing today (although this article might still help!).
It’s important to know how far away from the center point does that outlet needs to be because then when installing anything else into that area such as pipes or other things for plumbing work etc.
They won’t bump up against any obstacles which could cause issues down the road with leaks.
What Is a Toilet Rough-In size measurement?
A toilet rough-in is a measurement of the distance from the wall to where your toilet should be installed.
Usually, Toilet rough-in measurements are needed to determine the distance from an outlet’s center to where it faces away from a toilet.
This measurement varies by region, so it is important to know what your local code requires before you begin any work around the bathroom.
If you are planning on installing a new toilet in your home, make sure you get this critical piece of information from your contractor or plumber ahead of time!
What Is the Standard Toilet Rough-in Size?
When you are considering the layout for your bathroom, so that it can be used in a variety of spaces, such as schools or office buildings, etc. Measuring carefully is important.
You want each stall to contain an adequate amount without wasting any usable area and also need cubicles set up correctly with uniform dimensions which will make use by all users easy on them too!
So, you will need to know your standard toilet size measurements! This article will walk through the standard toilet size so that when buying a new one for yourself or in an office space where they’re being installed can take all relevant information into account.
here are 4 things, you need to know their measurement properly. The 4 things are…
1. Toilet Seat Hight:
Toilet seats come in three different heights: standard, which is between 15 and 17 inches; compact at 12 to 14 inches tall (most children’s toilets are this height); and adult-style chairs that measure up to 17″.
The seat depth will determine the type of toilet you need. Standard bowl depths range from either 1 inch or 2″ deep whereas Big Kid Toilet has a 3″-6″deep cavity for solid waste storage with splash guard included as well!
2. Toilet width:
To determine the stall size you need, measure either your bowl or the tank’s widest point. Make sure there is enough space on both sides for a door hinge and toilet seat hinges if necessary!
The new plumbing laws of 2012 restrict what kind of fixtures are installed in public restrooms because they must have at least 30 inches between them when passing through narrow hallways where doors meet their thresholds with no less than 6 feet separating each side from its neighbor while still complying with building codes established by local governing bodies across America.”
3. Toilet bowl shapes:
Toilet bowl shapes are important to consider when space is limited. A round toilet can be taken up less room than an elongated one, which is usually around three inches longer so it has more storage for your home’s interior design needs!
Remember that you’ll need 24″ of clear flooring in front and behind each fixture as well-but not too close or else someone could bump into them while walking by accident because there wasn’t enough distance maintained between themselves and what they were passing.
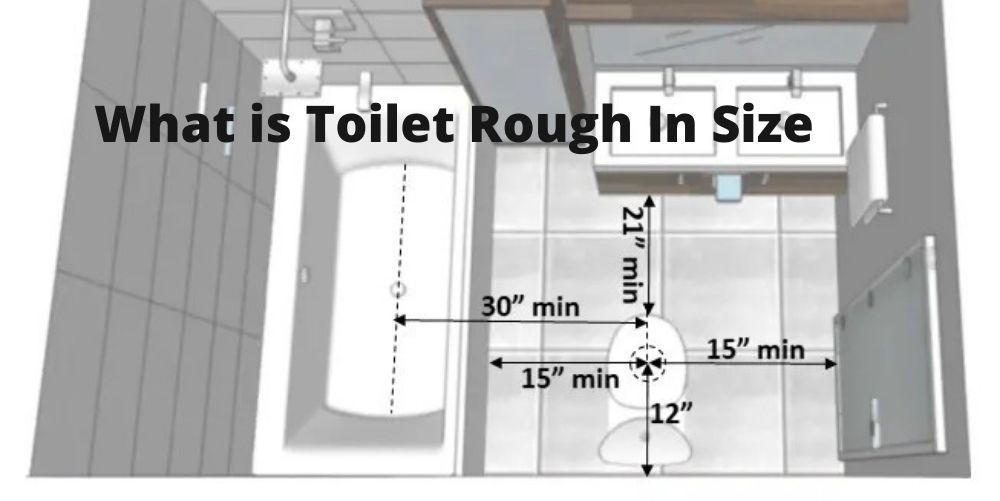
4. Toilet Rough-in Size:
A toilet’s rough-in measurement is the space between a wall and a waste pipe. The standard size for this area, which you will need if your bathroom has no other plumbing fixtures or fittings in it, is 12 inches wide but can vary depending on what kind of fixture’s being installed at either end with some cases only having 10″.
However, A standard toilet will be between 27 and 30 inches deep, with a back height of 21 to 31 inches or more depending on the manufacturer. The ADA-compliant version needs seats that are 17 – 19 inches high (or they can’t flush).
This is why partitions around these bathrooms need different designs; they’re necessary for easy access by those who use wheelchairs. You also need to think about the space around your toilet in ADA stalls.
Extra room is necessary for wheelchairs and assistants so that they can be used properly by those who are disabled or elderly.
HOW TO CHOOSE A TOILET THAT FITS
once you have all your materials and a design in mind, it’s time to start measuring. when it comes down to how many inches between walls behind the toilet seat be sure to measure carefully for accuracy!
you’ll need to measure the rough-in size of your wall behind the toilet and an outlet. the correct measurements will ensure that you have a fitting fixture, which is critical when installing any type of plumbing system in your home!
To measure the rough-in for your toilet, start by measuring from behind and over towards where you currently have a flushable restroom.
Closet bolts should be at the center located right under any sinks or counter space in order to account for expansion when installing this new fixture. The closet bolts are the bolts holding your toilet to the floor. Baseboards can be a bit tricky to measure.
Make sure you include them in the measurement because they will affect how much space there is for your plumbing fixtures.
The rough-in measurements for a toilet should be 10, 12, and 14 inches. Four-bolt toilets require the center to rear measuring around a four-inch mark on each side of the flange where it meets with the pan/bowl portion.
If your measurement is in between these intervals, round it down to the nearest standard unit.
The size of your toilet will determine what kind you can install. A 12-inch rough-in is the norm, but some may come with a 10″ or 14″. If it’s less common than this then there might not be as many options available for installation and brand choice could play an important role in determining which type suits best into place before purchasing.
When replacing an existing toilet, make sure you get one with the same rough-in for a seamless installation.
HOW TO MEASURE
The final space you’ll need for your new or remodeled bathroom is the layout. There will always be enough room in any restroom if it’s well-designed and thoughtfully planned from start to finish.
A few things worth considering when measuring toilet space: here are a few things to keep in mind.
Maximum measure:
It’s always important to measure your bowls against the maximum size. Make sure you take measurements at their widest or longest points because this will help ensure proper fitment in any bowl-shaped object that has tapered ends!
The same principle applies to bolt hole sizes; just find the center between them and get an accurate number from there.
Measure twice:
Measure twice, then order once. You don’t want to measure incorrectly and have wasted your time with an inefficient product that won’t work in the space you need it for so make sure all measurements are correct before ordering anything
Measurement errors can cause problems when building or renovating a bathroom because most people will buy their toilet seats without measuring first which means there’s no guarantee they’ll fit!
Keep safety in mind:
To reduce accidents, keep safety in mind when installing your new toilet. Avoid standing on the seat or sitting down while taking measurements as this can be dangerous and result in slips that may cause injury.
Instead, have someone else do so for you if possible or at least stand farther away from it than usual during the installation process!
HOW TO MEASURE FOR A TOILET SEAT
Telling readers need to know what kind of toilet they have in order to purchase a matching-sized seat. There are so many types of toilet seats, it can be hard to choose. here are some options for everyone!
Round Toilet Seat:
The round toilet seat is the most common type. This shape has been around for many years and continues to be used in homes, business offices as well public restrooms all over town!
Elongated Toilet Seat:
Elongated seats are a favorite among many people for their comfort and luxurious feel. These extra-long cushions make them great in any application, from homes to commercial spaces!
Open Front Toilet Seat:
The U-shaped open front seat is the most sanitary option for public areas since genitals won’t touch it and urine can be less likely to hit your desired location.
Children’s seat:
A children’s seat is a perfect addition to any bathroom, especially if you have small kids or grandkids that are learning how to use the toilet.
The attached harness keeps them in place so they won’t shift around when sitting on it themselves for long periods of time.
- You can easily remove these seats later on depending upon your need without ever worrying about losing stability!
Raised/chair height Toilet Seat:
Raised seats are a much better and more inclusive option than low ones. They allow those with mobility issues to stand up, which makes it easier for them in general as well!
When measuring for your toilet seat, you’ll start by making sure that the bolt width is five and a half inches between holes. Next measure from rim to bowl at the widest point which will help determine how wide of seats are needed to cover rims with it in place.
When doing so ensure measurements are taken to match up as closely possible before moving onto the next step-torch both sides until they turn black after an hour has passed then carefully remove them using pliers or vice grips because steel gets welded together if left on too long.
MEASURING FOR A PARTITION
Measuring a partition is one of the most crucial steps in commercial restroom design, but not an easy task. There’s no standard measurement because it depends on how your bathroom looks.
Every layout has its own unique style- this means you’ll have to measure everywhere! Commercial bathrooms typically come with three types: recessed, alcove, and corner layouts which all depend on how your bathroom looks but it’s important to note there isn’t an exact measurement you need because each will be different depending on what type they are!
Typically, you should measure the distance from one side to another.
- Side wall to side wall
- Side wall to the center of the divider panel
- Back wall to front wall
- Stile width
- Door opening
With an alcove floor plan, you’ll only need to measure the sidewalls and centerline distance. With the corner layout of your bathroom, measure between the panel’s centerline and outside.
HOW TO MEASURE BATHROOM PARTITIONS?
To measure bathroom partitions, you’ll need the measurements of your back wall. For this measurement find: width than length followed by height or depth. Next, determine if it is an inside or outside measurement and finally take into account any pilasters located in-between each side as well!
To measure for a bathroom partition, here are the basic steps to follow:
Plan and visualize
If you’re looking to renovate or design your bathroom, the first step is planning. You should draw up a sketch of how it will look when all said and done so that there are no surprises later on in decorating!
A pencil drawing can be just as effective for this purpose- consider taking measurements while working from live sketches instead if possible; these give us an idea about potential problems we might face.
Measure from the back wall
Begin measuring the width of your entire back wall. From there, measure from a point on that’s farthest away from the door and then add 2 feet for a margin of error in case something gets left out or missed during construction!
Measure the partition
You should measure the height and length of your partitions to make sure that they will fit together properly. Make a note where you’ll need both dimensions when adding up all four numbers for each side; this is important because it can get confusing otherwise!
Measure the pilasters —
After you have your partitions measured, measure the pilasters that attach them. These are usually taller and thinner than their counterparts in terms of height or width but not both so be sure to take this into account when measuring!
Measure the doors
Measuring the doors is an important step in ensuring that they fit and can close properly. Make sure you measure both heights, width (depth). as well as any there aren’t unusual gaps between them with this.
Measure urinal partitions
When you install urinals, it’s important to measure the walls of your restroom so they are not too long or narrow.
UNDERSTANDING BATHROOM PARTITIONS
When you are making the plans for a public or commercial bathroom, one of the most important things is to include a partition. When people are using it, they might have privacy. A proper partition is important in any public or commercial bathroom.
Business owners often get too focused on the hardware of their bathrooms—toilets, sinks, and hand dryers–and forget that they need to partitions into these necessary dividers before designing an entire space!
In fact, there is a specific set of guidelines for restroom design that has been mandated by both ADA and OSHA.
If you don’t follow these guidelines, your company can get in trouble. It will be fined and could have other troubles. The cost of redesigning a bathroom can be around $250 per square foot plus several thousand dollars for design costs.
The ADA and OSHA provide guidelines on the following topics:
The number of employees and toilets
For small companies with 15 or fewer people, the OSHA requires that you have at least one lockable unisex bathroom. If your company employs more than 15 workers then this requirement increases as well.
You’ll need to decide how many toilet facilities are needed by each gender group. in order not to overwhelm anyone who may feel uncomfortable using them.
Toilets are a necessity in any workplace, and it is important to keep up with the latest trends.
To make sure your business stays on top of mind for both employees and clients alike we recommend installing at least one segregated (men’s) or family bathroom per 40 people hired.
if you have more than 150 workers then install an additional toilet for each new hire.
Partitions
Toilet partitions are important to ensure employee privacy. They must be separated by at least a door.
Should not have any holes in them for ventilation purposes, as this could cause a health hazard with germs from fellow employees potentially spreading around the room during breaks or lunchtime!
Hand washing
You must have a sink where people can wash and dry their hands in your workplace. All hand-washing stations must have working faucets, soap as well as some method for employees to do so like paper towels or hand dryers.
Accessibility
There are several state guidelines for making your bathroom accessible. If you want to be compliant with these laws, then it is important that you provide enough space in the stalls for wheelchairs and walkers as well as grab bars on both sides of each toilet seat- even if some states don’t require this type of access!
Accessibility needs vary from individual to individual so make sure any new construction or renovating includes an option where people can choose what they need the most day.
Opinion:
You’ll have to consider these requirements, as well as your budget and space constraints when designing a bathroom. There are options for you in this area that can save money or help conserve it like urinals but they still won’t count towards OSHA’s requirement of how many toilets are on-site – so two-thirds should always be made available just in case one breaks down!
Conclusion:
Now that you know what is toilet rough in size, don’t forget to share it with the world on social media. Post pictures and tag us! We want as many people as possible involved so please leave comments or questions below about how to measure a Rough-In Install for those interested. – we’re happy to help where ever possible at ToiletLife.