Say Goodbye to Toilet Seat Twists with these Simple Tricks
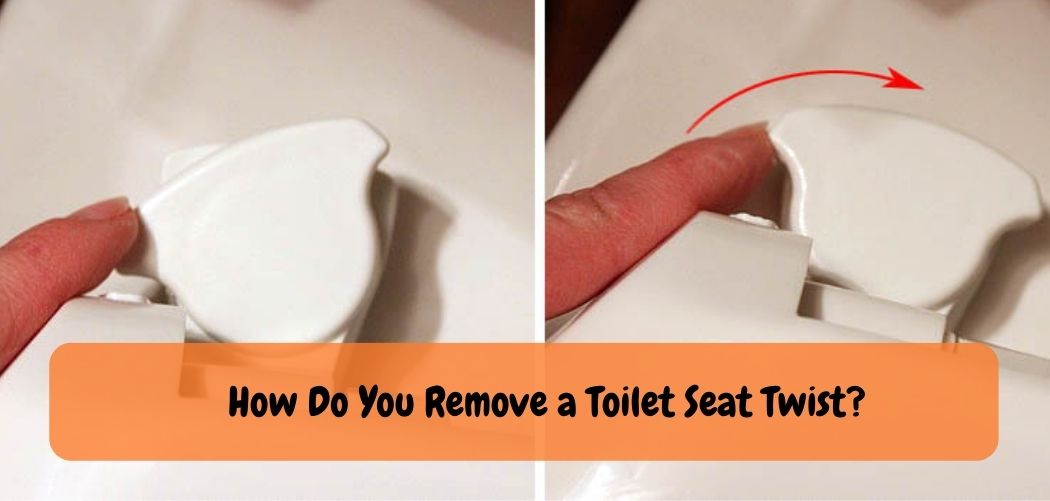
To remove a toilet seat twist, locate the small caps covering the screws at the back of the toilet seat and remove them, then use a screwdriver to tighten the bolts. This should fix the twist and stabilize the seat back in place.
Removing a toilet seat twist can be a frustrating experience for many homeowners. Whether you’re dealing with a wobbly or loose toilet seat, it’s essential to address the issue promptly to ensure comfort and prevent further damage.
In this guide, we will explore the various methods and tools you can use to remove a toilet seat twist effectively. From basic hand tools to specialized techniques, we will provide step-by-step instructions to help you tackle this common household problem and restore stability to your toilet seat.
So, if you’re ready to say goodbye to that annoying twist and regain a sturdy toilet seat, let’s dive in and discover the solutions to remove a toilet seat twist.
Understanding Toilet Seat Twists
Toilet seat twists are a common household annoyance that we have all dealt with. They can disrupt our daily routine and even affect bathroom hygiene. These twists happen when the seat becomes loose and starts moving, causing discomfort when used.
When left unattended, it may lead to accidents and injuries. Toilet seat twists occur due to several reasons, including wear and tear or incorrect installation. However, it can be easily fixed by tightening the bolts or adjusting the hinges.
Keeping your toilet seat stable and secure is essential to having a smooth and comfortable bathroom experience. Don’t suffer in silence, deal with that annoying toilet seat twist today.
Easy Guide on: How Do You Remove a Toilet Seat Twist?
In this informative guide, we will walk you through the process of removing a toilet seat twist, providing you with various methods and techniques to tackle the issue effectively. So, let’s get started and restore stability to your toilet seat.
Tools and Materials Needed:
Before you begin, gather the following tools and materials:
- Adjustable wrench
- Screwdriver (Phillips or flat-head, depending on the screws)
- Pliers
- Penetrating oil (e.g., WD-40)
- Replacement toilet seat (optional, if needed)
Method 1: Tightening Loose Screws:
If your toilet seat twist is caused by loose screws, follow these steps to tighten them:
Step 1: Locate the Screws:
Inspect the underside of your toilet seat to identify the screws holding it in place. Typically, there are two screws at the back of the seat near the hinges.
Step 2: Secure the Nuts:
Using an adjustable wrench or pliers, hold the nuts on the underside of the toilet bowl firmly. This prevents them from turning while you tighten the screws.
Step 3: Tighten the Screws:
Using a screwdriver, rotate the screws in a clockwise direction to tighten them. Apply even pressure to both screws to ensure balance and stability.
Step 4: Test the Seat:
Once the screws are tightened, check if the toilet seat twist has been resolved. Sit on the seat and see if it remains steady. If not, proceed to the next method.
Method 2: Lubricating Hinges and Bolts:
If the toilet seat twist is caused by rusty or stiff hinges and bolts, lubrication can help restore movement and stability. Follow these steps:
Step 1: Apply Penetrating Oil:
Spray a generous amount of penetrating oil, such as WD-40, onto the hinges, bolts, and screws. Allow the oil to penetrate for a few minutes to loosen any rust or debris.
Step 2: Loosen Stuck Components:
Using pliers or an adjustable wrench, gently try to loosen any stuck or seized components, such as bolts or nuts. Be cautious not to apply excessive force, as it may damage the parts.
Step 3: Tighten and Adjust:
After loosening any stuck components, tighten the screws and bolts using the appropriate tools. Ensure that all the connections are secure and balanced.
Step 4: Check Stability:
Sit on the toilet seat and test its stability. If the seat twist persists, it may be time to consider replacing the toilet seat altogether.
Method 3: Replacing the Toilet Seat:
If the previous methods fail to resolve the toilet seat twist, it may be necessary to replace the seat. Follow these steps:
Step 1: Purchase a Replacement:
Measure your current toilet seat to determine the appropriate size and shape. Purchase a replacement seat that matches these specifications.
Step 2: Remove the Old Seat:
Locate the screws or bolts that secure the seat to the toilet bowl. Unscrew them in a counterclockwise direction using a screwdriver or pliers. Lift the old seat off the toilet bowl and set it aside.
Step 3: Install the New Seat:
Align the holes on the new toilet seat with the mounting holes on the toilet bowl. Insert the screws or bolts through the holes and tighten them securely. Follow the manufacturer’s instructions for specific installation guidelines.
Step 4: Test the New Seat:
Sit on the newly installed toilet seat and ensure it is stable and free from any twists or wobbling. Apply pressure from different angles to check for any movement or instability. If the seat feels secure and does not exhibit any twist, you have successfully replaced the toilet seat.
Step 5: Regular Maintenance:
To prevent future toilet seat twists, it’s important to practice regular maintenance. Periodically check the screws, bolts, and hinges for any signs of loosening or rust. If you notice any issues, tighten or lubricate them as necessary. Additionally, avoid placing excessive weight or pressure on the seat, as this can cause strain and lead to instability.
Simple Tricks To Eliminate Toilet Seat Twists
Toilet seat twists are a common problem that can be frustrating to deal with. Choosing the right toilet seat is crucial, as different types have various pros and cons. Comparing them can help in making the best decision. Proper installation is also important, and many people make mistakes, causing twists to occur.
Avoiding common mistakes and following a step-by-step guide can eliminate twists. Maintaining and cleaning the seat regularly is essential. There are specific techniques to do it, preventing any twisting issues. Lastly, ensuring the seat is tight and secure is crucial.
These simple tricks can easily eliminate any twists, making your bathroom experience comfortable and hassle-free.
Frequently Asked Questions On How Do You Remove A Toilet Seat Twist?
How Do You Know If The Toilet Seat Bolts Are Rusty?
If you see brown or reddish orange stains, you have rusty bolts.
Why Is The Toilet Seat Twisty?
The bolts may be loose or the hinges may be worn out.
How Do You Remove A Rusty Toilet Seat Twist?
Use a lubricant like wd40, and a wrench or pliers to loosen and remove the nuts.
Can You Fix A Wobbly Toilet Seat Without Tools?
Yes, adjust the nuts using your hands to tighten them.
How Do You Prevent Toilet Seat Twists?
Check and tighten the bolts frequently. Use plastic washers to protect the bolts from rusting.
Conclusion
Toilet seat twists can be a pesky problem that disrupts bathroom routines and can even cause discomfort. However, you can easily remove a toilet seat twist on your own with the help of some basic tools and techniques. By following the steps we provided earlier, you can have a stable and secure toilet seat in no time – all while keeping your bathroom routine uninterrupted.
Remember to properly maintain your toilet seat to prevent similar problems from occurring in the future. Take some time to check on your toilet seat every few months, and if you notice any issues, address them promptly. With these tips in mind, you can keep your toilet seat functioning properly, with minimal stress and inconvenience.
