To remove a concealed fitting toilet seat, locate the hinges and use a screwdriver to unscrew them. Then, lift the seat and carefully pull it away from the toilet bowl.
Welcome to our guide on “How to Remove a Concealed Fitting Toilet Seat!” Toilet seats may seem straightforward to remove, but concealed fitting toilet seats can pose a bit of a challenge. Unlike traditional seats with visible screws.
Concealed fitting seats are designed to enhance the overall aesthetics of your bathroom by hiding all the fixings. While this makes for a sleek and seamless appearance, it might leave some wondering how to go about removing them when the need arises.
Whether you want to clean the seat thoroughly, replace it with a new one, or perform maintenance on your toilet, we’ve got you covered. In this guide, we will walk you through the step-by-step process of safely and efficiently removing a concealed fitting toilet seat without any hassle. Let’s get started and have your toilet seat removed with ease!
Understanding The Anatomy Of A Concealed Fitting Toilet Seat
Concealed fitting toilet seats are becoming increasingly popular these days due to their sleek and modern appearance. Such seats consist of two main components; the seat itself.
Which is made of anti-bacterial plastic, and the hinges. These hinges are then screwed into the toilet bowl to attach the seat.
The design of concealed fitting toilet seats allows them to be mounted from above, eliminating any visible screws and bolts. They offer numerous benefits,
Including easy cleaning and a non-slamming feature that reduces noise and prevents damage to the seat. Any homeowner can easily remove a concealed fitting toilet seat by simply unclipping it. It’s that simple!
How to Remove a Concealed Fitting Toilet Seat: A Step-by-Step Guide
Removing a concealed fitting toilet seat might seem daunting at first, but with the right tools and a little know-how, it can be a straightforward process. Concealed fitting toilet seats are designed to hide the mounting hardware, giving your bathroom a sleek and modern appearance.
Whether you need to replace a damaged seat, clean the area thoroughly, or perform maintenance on your toilet, this informative guide will walk you through the steps to safely and efficiently remove a concealed fitting toilet seat.
Tools You’ll Need:
- Flathead screwdriver
- Adjustable wrench (optional, depending on the type of concealed fittings)
- Allen wrench or hex key (for some concealed fitting seats)
- Plastic caps or covers (included with most concealed fitting toilet seats)
Step 1: Identify the Type of Concealed Fittings
Before you begin, it’s essential to determine the type of concealed fittings your toilet seat has. There are two common types:
Type 1: Screwless Snap-On Fittings
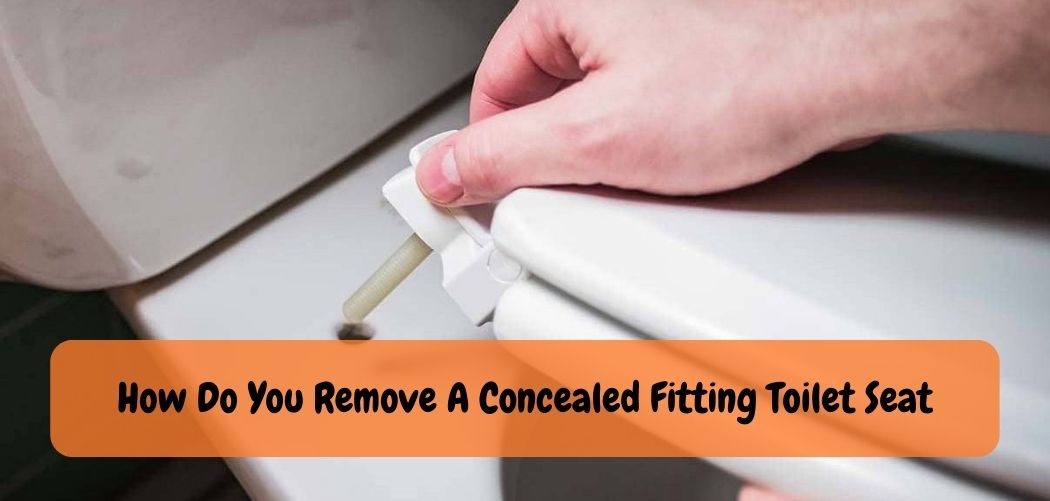
These types of concealed fittings can remove without the use of tools. Look for small plastic caps or covers on the sides of the toilet seat. These caps are usually located near the back of the seat, where the hinges connect to the toilet bowl.
Type 2: Bolted Fittings with Access Holes
In this type of concealed fitting, there are access holes on the bottom of the toilet seat. You will need an Allen wrench or hex key to remove them.
Step 2: Removing a Screwless Snap-On Fitting Toilet Seat
- Start by locating the plastic caps or covers on the sides of the toilet seat near the back.
- Insert a flathead screwdriver under the edge of the plastic cap and gently pry it upward. Be careful not to use excessive force to avoid damaging the cap or the toilet seat.
- Once the cap is lifte, you should see a small tab or button. Press down on the tab or button while simultaneously lifting the toilet seat upwards. This action will release the snap-on fitting.
- Repeat the process on the other side of the seat until both snap-on fittings are release.
- Lift the toilet seat away from the hinges and set it aside.
Step 3: Removing a Bolted Fitting Toilet Seat with Access Holes
- Check the bottom of the toilet seat for access holes. These are usually small holes located near the back of the seat, above the hinges.
- Take an Allen wrench or hex key that fits into the access holes.
- Insert the Allen wrench or hex key into the access hole on one side. Turn it counterclockwise to loosen and remove the bolt.
- Repeat the process on the other side until both bolts are fully remove.
- Once the bolts are remove, lift the toilet seat upwards and away from the hinges.
Step 4: Cleaning and Maintenance (Optional)
If you are removing the toilet seat for cleaning or maintenance purposes, take this opportunity to clean the toilet bowl and the area around the hinges thoroughly. Use a mild detergent or a bathroom cleaner to sanitize the surfaces. Check the fittings for any signs of wear or damage, and if necessary, replace them before reinstalling the toilet seat.
Step 5: Reinstalling the Toilet Seat (Optional)
To reinstall the concealed fitting toilet seat, simply reverse the steps above. For snap-on fittings, position the seat over the hinges and press down firmly until you hear a click, indicating the fittings are securely in place. For bolted fittings, insert the bolts into the access holes and tighten them with the Allen wrench or hex key until snug.
Also Read: How to Remove American Standard Toilet Seat?
When To Remove A Concealed Fitting Toilet Seat
If you notice any damage or looseness, it may be time to remove your concealed fitting toilet seat. Neglecting regular maintenance and cleaning can cause potential health issues. Removing the seat can also help in preventing any damage to the toilet itself.
It’s essential to use appropriate tools and techniques when removing the seat to avoid any injuries or further damage. Always consult the manufacturer’s instructions before attempting to remove the seat.
By taking care of your toilet seat, it can last for years and prevent any unnecessary expenses. Regular checking and cleaning can not only save money but also ensure a hygienic and safe bathroom environment.
Frequently Asked Questions On How Do You Remove A Concealed Fitting Toilet Seat?
How Do You Remove A Concealed Fitting Toilet Seat?
To remove a concealed fitting toilet seat, locate the release buttons and press them while lifting the seat.
What Tools Do You Need To Remove A Concealed Fitting Toilet Seat?
You’ll need a screwdriver or allen key, depending on the type of concealed fitting.
Can You Reuse A Concealed Fitting Toilet Seat After Removing It?
Yes, as long as the fittings are still in good condition. Use caution when reinstalling the seat.
Is It Necessary To Turn Off The Water Supply Before Removing A Concealed Fitting Toilet Seat?
No, it’s not necessary unless you need to work on the water supply line during the removal process.
How Do You Know If Your Toilet Seat Has A Concealed Fitting?
If you can’t see any visible screws or bolts holding the seat in place, it likely has a concealed fitting.
Conclusion
Removing a concealed fitting toilet seat may seem like a daunting task, especially if you have no prior experience. However, with the right tools and approach, it can be a relatively simple process. Remember to turn off the water supply, loosen the bolts, and remove the seat carefully to avoid damaging your toilet.
While it may be tempting to use force or rush the process, taking your time can prevent costly mistakes and ensure a successful removal. If you encounter any difficulties, don’t hesitate to seek professional help. Investing in a new toilet seat can also provide a fresh, updated look to your bathroom.
With these tips, you can confidently remove a concealed fitting toilet seat and complete your bathroom maintenance with ease.