Upflush toilets, also known as macerating toilets, are becoming increasingly popular in homes and buildings due to their unique waste disposal system. Unlike traditional toilets, upflush toilets use a macerating pump to break down solid waste into fine particles, making it easier to transport through the plumbing system.
However, like any toilet, upflush toilets may eventually need to be replaced due to wear and tear, damage, or outdated design. In this article, we will explore the steps to properly replace an upflush toilet, including preparation, installation, and testing. With the right tools and knowledge, you can replace your upflush toilet and restore your bathroom to full functionality.
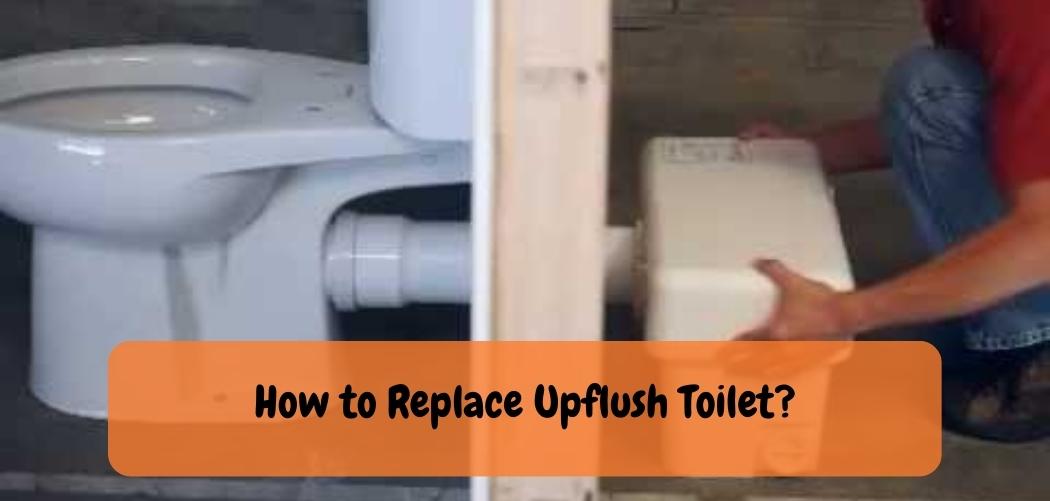
How to Replace Upflush Toilet?
Replacing an upflush toilet may seem like a daunting task, but with the right tools and knowledge, it can be done quickly and easily. Here are the steps to properly replace an upflush toilet:
- Turn off the water supply and power supply to the existing toilet.
- Remove the existing toilet and disconnect it from the macerator pump and waste pipes. Make sure to follow the manufacturer’s instructions for the removal of the toilet.
- Remove the old wax ring and clean the flange and drain pipe thoroughly.
- Measure the distance from the flange to the macerator pump and select a new upflush toilet that will fit properly.
- Install a new wax ring onto the flange and carefully lower the new toilet onto the flange, making sure it is level and seated properly.
- Connect the toilet to the macerator pump and waste pipes using the manufacturer’s instructions and approved connectors.
- Turn on the water supply and power supply and test the toilet for leaks and proper functioning.
- Install the toilet seat and any additional accessories.
To ensure a proper installation, it is recommended to have a licensed plumber or upflush toilet specialist perform the installation. They can also advise on any necessary modifications or upgrades to the plumbing system. Regular maintenance and proper use of the toilet can help prolong its lifespan and prevent the need for frequent replacements.
Upflush Toilet Problems

If you’re having issues with your upflush toilet, there are a few things that could be causing the problem. First, check to make sure that the pump is properly connected to the power source. Next, check that the inlet and outlet valves are open and unobstructed.
Finally, check for any leaks in the system. If you’re still having problems after checking these things, it’s best to call a plumber or septic tank specialist.
Upflush Toilet And Shower Installation
An upflush toilet is a great way to add a toilet to your home without having to break through concrete or dig a hole in your yard. Upflush toilets are also much easier to install than traditional toilets, and they take up less space. If you’re thinking about adding an upflush toilet to your home, here’s what you need to know about installation.
The first thing you’ll need to do is find a spot for the toilet. It’s important that the location you choose is level, so that the toilet flushes properly. Once you’ve found a level spot, mark the center of it with a pencil so that you know where to start digging.
Next, use a shovel or post hole digger to dig a hole that’s big enough for the base of the upflush toilet. The base should be level with the ground around it, so make sure to check as you go. Once the hole is dug, place the base in and fill around it with dirt or sand until it’s level with the ground.
Now it’s time to connect the plumbing for your new toilet. Most upflush toilets come with everything you need for installation, including PVC pipe and fittings, but if yours doesn’t include these items then you’ll need to purchase them separately. Follow the instructions that came with your particular model of toilet carefully when connecting everything – if done correctly, this should be a fairly straightforward process.
Finally, once all of the plumbing is connected test out your new toilet by flushing it several times. If everything appears to be working properly then congratulations – you’ve just installed an upflush toilet!
Upflush Toilet And Sink Combo
An upflush toilet and sink combo is a great way to save space in your bathroom. This type of fixture is designed to be installed above the floor, which means that you won’t have to worry about taking up valuable floor space with a traditional toilet. Upflush toilets are also easy to clean, since they don’t have any nooks or crannies for dirt and grime to hide in.
And, if you’re worried about water conservation, an upflush toilet uses less water than a standard flush model. If you’re considering adding an upflush toilet and sink combo to your bathroom, there are a few things you should keep in mind. First, make sure that you have enough headroom above the floor for the unit.
You’ll also need access to a vent stack or other ventilation system, since the unit will be discharging air and wastewater into it. Finally, consult with a professional plumber before making any final decisions – they can help ensure that your new fixture is installed correctly and safely.
How Do You Install an Upflush Toilet?
An upflush toilet is a great way to add a bathroom to your home without having to go through the hassle and expense of traditional plumbing. While most upflush toilets come with installation instructions, there are a few things you need to know before you get started. Tools and Materials Needed:
-Upflush toilet unit -PVC piping (1 1/2-inch diameter) -PVC primer and cement
-2×4 lumber (optional) -Drill -Teflon tape
-Adjustable wrench
Steps: 1. Choose the location for your new bathroom. An upflush toilet can be installed almost anywhere in your home as long as there is access to a main sewer line. Keep in mind that the unit will need electricity, so you’ll also need to have an outlet nearby.
Steps: 2. Once you’ve chosen the location, mark the outline of where the new bathroom will go on the floor. If you’re installing over concrete, you may want to use 2×4 lumber to create a frame for easy install later on.
Steps: 3.
Begin by running PVC piping from the main sewer line to where your new bathroom will be located. Make sure to slope the pipe slightly downwards so that waste will flow easily into it. Secure all joints with PVC primer and cement according to manufacturer’s instructions.
Steps: 4. Next, attach your upflush toilet unit onto the end of the PVC piping using Teflon tape and an adjustable wrench to secure all connections tightly shut . Again, make sure that everything is properly sloped so that waste will flow freely into the system .
Steps: 5 . Finally , drill a hole in one of the walls for an electrical outlet and run any wiring needed before screwing or nailing the outlet cover back into place . he Once everything is plugged in and ready to go , give your new bathroom a test flush !
How Long Do Upflush Toilets Last?
Upflush toilets are a type of sewage system that is commonly used in homes and businesses. These toilets are designed to flush waste up and out of the bowl, instead of down into a septic tank or sewer line. Upflush toilets can last for many years with proper care and maintenance.
Saniflo Upflush Toilet Installation Tips, Actual Installation
Conclusion
How to Replace Upflush Toilet? To replace an upflush toilet, you will need to remove the old unit and install the new one in its place. Make sure to follow all manufacturer instructions carefully.