How to Install a Toilet Flange in New Construction? The Easy Guide!
Installing a toilet flange is an important step in installing any bathroom. If you don’t install it properly, your house may leak booing gas and water around which can affect the living space as well. So, people are concerned about how to install a toilet flange in new construction nowadays?
In today’s this post, we will talk about the most convenient way to install a toilet flange. We have included two different methods for installing a toilet flange in new construction. So, be sure and keep reading this para where we talk about how simple it can really get done in just minutes.
There are many different ways to install a toilet flange, and we’re going to look at two methods of the most convenient today. For example, if you want an easy installation on concrete floors then check out method number one. Then there’s also installing it tile-side up which is what our number two shows!
Hopefully, these quick tips will help make things easier when plumbing time comes around again!
Prepare the Pipe
For Installing a new toilet flange in your bathroom! Firstly, you have to Prepare the Soil Pipe. The soil pipe in new construction is rarely flush with the ground.
The advantage of this design is that, unlike standard rough-in pipes, typically you won’t find any decorations on your floor which could get covered up by a cutout section of piping when it’s installed!
This makes cutting down and preparing much easier–here are some steps for getting started:
1.Measure the distance from the wall

The distance from your wall will determine what kind of toilet you can use. If it’s less than 10 inches, then an offset flange is necessary in order for the bowl to sit close enough.
It should be about 10 or 12 inches from the wall. And not too far away from where there are outlets nearby.
2.Pipe Measurements
Measure the diameter of your plumbing pipe. You need to figure out what flange size you’ll need based on this measurement, so typically these come in sizes between 2 and 4 inches.
3.Pipe Cutting
All you need to do is cut the pipe. You can use any kind of saw to cut the pipe, but just make it flush with your floor and try not to bend too much so that will ensure a straight cut.
A reciprocating saw like the Sawzall would be good because they have more flex in them which allows for getting a good flush cut.
4.Prepare the pipe
Preparing the pipe is a key step in installing it. Deburr the pipe by using sandpaper or deburring tools. For closet flanges, this step is important!
Make sure you make the smoothest cut possible and avoid removing any material. Afterward, wipe down your work surface with a damp cloth to remove all of the dust or other debris from it before drying fully, and make sure it is completely clean and dry before proceeding.
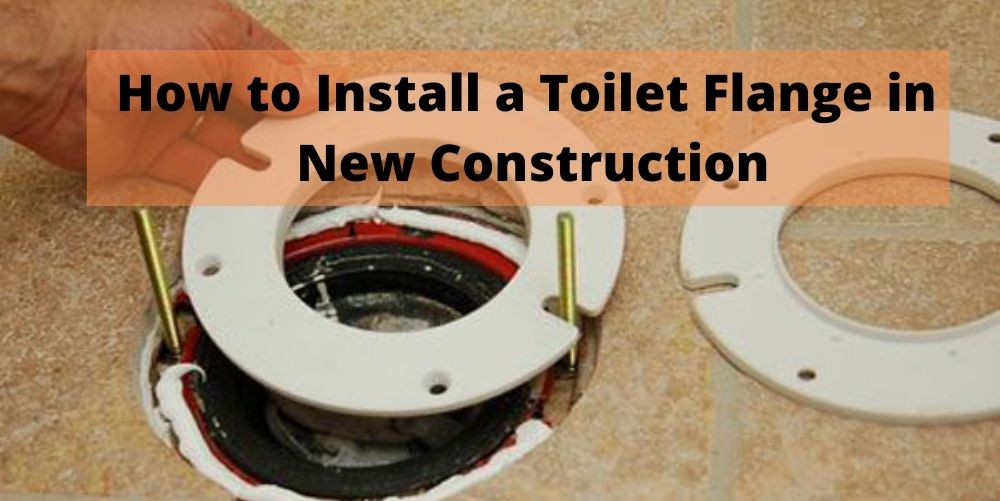
Install the Flange
Now that you have prepared and cleaned the pipe, it’s time to install a new flange. Make sure your chosen one is correct for this job by checking its diameter before installation!
Here are two helpful methods are below:
1.How to Install a Toilet Flange on the Concrete in New Construction?
Before we begin the fixing of your toilet flange, remember that it is different from when you replace one. You won’t have to deal with uneven surfaces and so on!
Now let’s set up a new toilet flange on the concrete floor for this repair job by following the below instructions carefully.
Step 1
You must first cut the toilet flange’s soil stack to make it even with the concrete floor. Which we wrote are above.
Step 2
Now you will require to put the closet of your toilet flange into an adjacent drainpipe. The rotating flange closet fits comfortably around it and ensures that there is no leaking or any damage done by misalignment, as this can cause something to go wrong in case not fixed correctly!
Step 3
Now take the closet flange away from your drainpipe to apply PVC primer on it. You need a thin layer of this material inside, as well as outside where you see joints between soil pipes and water pipe walls in order for them not to leak later down the line!
Now use PVC cement on both sides of the flange. Then reset it carefully so that you don’t crack or break any pipes in your drain!
Step 4
The toilet flange should be in a parallel direction to the wall located behind it. So, move your rim until you get to that point where there’s nothing but cement between them.
And then press down on top for about three seconds before seating into place again so as not to have any movement occur when seated all the way through.
Step 5
Now you will need to make sure that the toilet flange doesn’t move after installation. To stop this movement of the rim, use stainless steel screws and nuts which are stronger than other materials because they won’t corrode over time as rust does.
Step 6
The two closet bolts with the flange package should be fitted by matching them up to a ball of similar threading and then securing it in place. The closet bolts threads on these items will face upwards, so that’s how you know which way they go!
Finally, place the wax ring on top so that you can install your new toilet easily. Put in a few turns and watch as it locks into position! Congratulations! Now you have done successfully set up a new toilet flange on a concrete floor.
To know How to Install a Toilet Flange on the tile in New Construction keep reading our methods number two that’s are below
2. How to Install a Toilet Flange on the tile in New Construction?
A toilet flange on the tile floor anchors your new sewer system securely. In order to set up a proper collar, follow these easy steps:
- Place the flange on top of your tile. As you do so, make sure to keep these things in mind-
- Make sure the back holes are parallel with each other and line up against your wall.
- Two slots need to be parallel with the two side walls.
This means that they should extend from one wall-length into another and not by just a little bit, or else there will likely be gaps where dirt is able to get inside which makes your Grade look messy. Gaps are never okay because it looks amateurish!
- Now mark the drilling areas to tighten up your toilet flange. You’ll need at least four spots so that it’s firmly in place and flush with no leaks!
- The variable speed drilling machine is a great option for creating the holes in your project.
- Once you have drilled the holes and countersink them, one by one tighten up each screw using a Phillips head Screwdriver.
- Make sure that all the screws have been fastened, and you’ve set up your toilet flange appropriately. If it keeps moving after doing so- be aware of rechecking when installing!
Congratulations You did it! You have successfully put the toilet flange on the tile in New Construction!
Finial Word
For your home to stay clean and healthy proper toilet is an utmost necessity. And if you want to get a proper toilet one.
Make sure that you must know how to install a toilet flange in new construction. It doesn’t allow any water or gas leakage so your home stays clean and healthy!
We hope the steps mentioned above will come in handy for you. Moreover, they’re straightforward and so won’t require any professional plumbing helps which can save your money and time!
FAQ’s
How much does it cost to Install a Toilet Flange in New Construction?
If you plan to install your own toilet flange, the price is typically about $20. If not doing this yourself then a plumber will charge anywhere between 200-350 dollars for installation.
However, it can vary depending on where and how long they work as well as what type of materials are used in construction which would bring up their cost per hour or day respectively.
What Toilet Flanges are The Most Durable?
There are many types of flanges, but brass and stainless steel are the most durable. PVC is usually preferred by homeowners because they can handle DIY jobs more easily with these materials
On the flip side, many people aren’t fans of ABS flanges. These more rigid pieces tend to be crack-prone and rust over time causing leaks.
Can Toilet Be Installed Without a Flange?
Mounting your toilet to the floor can be tricky and requires expertise. The flange provides a perfect surface for wax seal, as well as preventing gaps between soil pipe and bowl.
A toilet flange is the best way to ensure your bathroom meets current requirements and lasts for years. A plumber can install one, if necessary, but it’s always better in this case since they’re designed with durability in mind!