How to Fix a Kohler Toilet That Keeps Running?
Kohler toilets are known for their durability and reliability, but like any other toilet, they can sometimes experience issues. One common problem is a toilet that keeps running after flushing, which can be frustrating and wasteful.
If you’re experiencing this issue with your Kohler toilet, fear not! In this guide, we will explore step-by-step instructions on how to fix a Kohler toilet that keeps running. From identifying the potential causes of the problem to providing practical solutions, we’ll help you troubleshoot and resolve the issue so you can enjoy a properly functioning toilet once again.
Whether you’re a seasoned DIY enthusiast or a novice homeowner, this guide will provide you with the knowledge and confidence to tackle the task and get your Kohler toilet back in working order.
Running Kohler Toilet Fixing Guide
In this comprehensive guide, we will provide you with step-by-step instructions on how to fix a Kohler toilet that keeps running. From identifying the potential causes of the problem to providing practical solutions, we’ll guide you through the troubleshooting process and help you resolve the issue effectively.
Tools and Materials Needed: Before getting started, you will need a few tools and materials to fix a Kohler toilet that keeps running. Here’s a list of items you’ll need:
- Adjustable wrench or pliers
- Screwdriver (flathead and/or Phillips)
- Replacement parts (such as a fill valve, flush valve, flapper, or float assembly) – these can be purchased from a local hardware store or ordered online
- Towels or rags for cleanup
- Bucket or container for water removal (if necessary)
- Cleaning supplies (optional)
Note: It's always a good idea to check your toilet's warranty and manufacturer's recommendations before attempting any repairs to ensure that you don't void the warranty or cause further damage.
Step 1: Turn off the Water Supply:
The first step in fixing a Kohler toilet that keeps running is to turn off the water supply to the toilet. Locate the shut-off valve, which is usually located on the wall or floor behind the toilet, and turn it clockwise until it is fully closed. This will prevent water from flowing into the toilet tank while you work on the repairs.
Step 2: Remove the Toilet Tank Lid:
Next, carefully remove the toilet tank lid by lifting it straight up or gently sliding it towards the back of the toilet and lifting it off. Place the lid in a safe spot where it won’t get damaged.
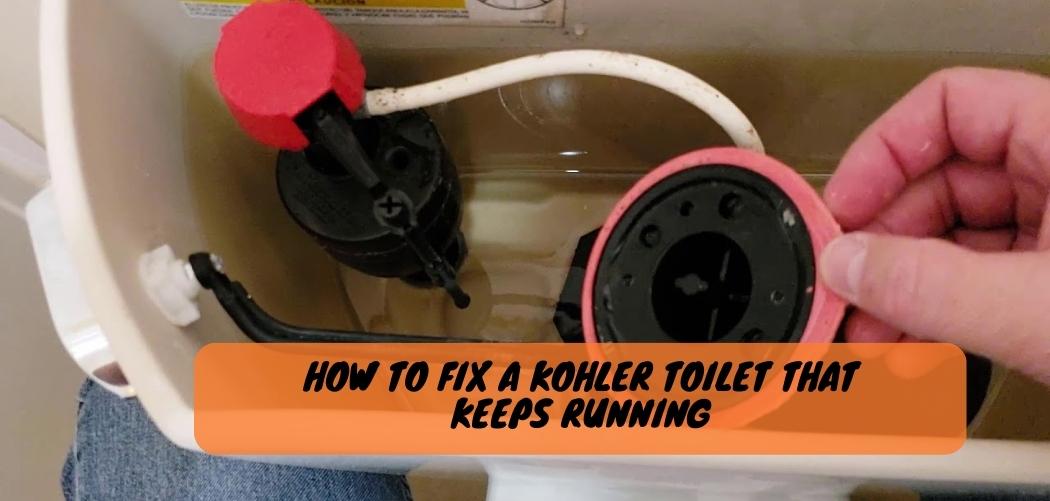
Step 3: Inspect the Toilet Components:
With the toilet tank lid removed, you can now inspect the various components inside the tank that may be causing the toilet to keep running. These components include the fill valve, flush valve, flapper, float assembly, and overflow tube.
1. Fill Valve: The fill valve is responsible for refilling the toilet tank with water after flushing. Check for any signs of leaks or damage, such as cracks or corrosion.
2. Flush Valve: The flush valve is located at the bottom of the tank and is responsible for releasing water into the toilet bowl during flushing. Inspect the flush valve for any debris or mineral buildup that may be preventing it from sealing properly.
3. Flapper: The flapper is a rubber or plastic piece that covers the flush valve and is lifted during flushing to allow water to flow into the toilet bowl. Check the flapper for any cracks, warping, or debris that may be preventing it from closing tightly.
4. Float Assembly: The float assembly is responsible for controlling the water level in the toilet tank. Check the float assembly for proper adjustment and ensure that it moves freely without any obstructions.
5. Overflow Tube: The overflow tube is a vertical tube that prevents the toilet tank from overflowing. Make sure the overflow tube is not cracked or damaged.
Step 4: Clean or Replace Faulty Components:
Depending on your inspection, you may need to clean or replace some of the toilet components to fix the issue of a Kohler toilet that keeps running. Here are some common solutions:
1.Cleaning:
If you notice any debris, mineral buildup, or sediment on the fill valve, flush valve, flapper, or float assembly, use a clean cloth or a brush to gently clean them. Be careful not to use abrasive materials that may damage the components or scratch the surfaces.
2. Flapper Replacement:
If the flapper is cracked, warped, or not closing tightly, it may need to be replaced. To do this, drain the toilet tank by flushing and holding down the flush handle to empty the water. Disconnect the flapper from the flush valve by unhooking or unscrewing it, depending on the type of flapper. Install the new flapper according to the manufacturer’s instructions and ensure it is properly aligned and closes tightly.
3. Fill Valve Replacement:
If the fill valve is leaking, damaged, or not functioning properly, it may need to be replaced. To do this, turn off the water supply to the toilet and drain the tank. Disconnect the water supply line from the fill valve using an adjustable wrench or pliers. Remove the old fill valve by unscrewing or unclipping it from the toilet tank. Install the new fill valve following the manufacturer’s instructions and reconnect the water supply line.
4. Flush Valve Replacement:
If the flush valve is clogged, damaged, or not sealing properly, it may need to be replaced. To do this, drain the toilet tank and remove the flapper. Disconnect the flush valve from the bottom of the toilet tank by unscrewing or unclipping it. Install the new flush valve according to the manufacturer’s instructions and reconnect the flapper.
5. Float Assembly Adjustment or Replacement:
If the float assembly is not adjusted properly or is damaged, it may need to be adjusted or replaced. To do this, adjust the float assembly to the correct water level according to the manufacturer’s instructions. If the float assembly is damaged, it will need to be replaced following the manufacturer’s instructions.
Step 5: Reassemble and Test:
Once you have cleaned or replaced any faulty components, reassemble the toilet tank by following the reverse order of the disassembly. Tighten any connections securely, but be careful not to overtighten and cause damage. Turn on the water supply to the toilet by opening the shut-off valve and allow the tank to fill with water.
Flush the toilet and observe if the issue of the toilet running persists. If the problem is resolved and the toilet no longer keeps running, then congratulations! You have successfully fixed your Kohler toilet. If the issue persists, you may need to double-check your work or seek further assistance from a professional plumber.
Why Kohler Toilet Keeps Running After Flush?

If your Kohler toilet keeps running after flush, there are a few things you can do to fix the problem. First, check to see if the water level in the tank is too low. If so, adjust the float arm to raise the water level.
Next, check to see if the fill valve needs adjusting. If it does, turn off the water supply and remove the cap from the valve. Adjust the screw on the side of the valve to raise or lower the water level.
Why Kohler Toilet Still Running After Replacing Seal?
If you’ve replaced the seal on your Kohler toilet and it’s still running, there are a few things you can check. First, make sure that the flapper is seat properly. If it’s not, water will continue to run from the tank into the bowl.
Next, check the float ball to see if it’s stuck in the up position. If so, water will also continue to run. Finally, check the fill valve to see if it’s set at the correct level.
If it’s too high, water will continue to run into the overflow tube and out of the toilet bowl.
What is the Most Common Problem That Occurs When the Toilet Won’T Stop Running?
If your toilet won’t stop running, the most likely problem is that the flapper or flush valve seal has deteriorat and needs to replace. The flapper is a rubber seal that sits over the flush valve opening at the bottom of the tank. When you push down on the handle, the flapper lifts up and allows water to flow from the tank into the bowl.
Over time, mineral deposits can build up on the flapper and prevent it from sealing properly. The other possibility is that the float ball is stuck in the “up” position. The float ball is a plastic ball that rises as water fills up in the tank so that it can shut off the flow of water when it reaches a certain level.
If something is preventing it from moving up (perhaps because it’s caught on something), then water will continue to enter even after reaching its desire level, causing your toilet to run constantly.
How to Fix a Kohler Flush Valve?
If your Kohler flush valve is not working properly, there are a few things you can do to fix it. First, check to see if the valve is clog. If it is, clean it out with a plunger or a snake.
If that doesn’t work, you may need to replace the valve.
Kolher toilet running no problem
Conclusion
Fixing a Kohler toilet that keeps running is a relatively straightforward process that can save you from wasting water and experiencing the annoyance of a constantly running toilet.
By following the troubleshooting steps and solutions outlined in this guide, you can effectively identify and address the root cause of the issue. Remember to always prioritize safety and follow manufacturer instructions when working on your toilet.
If you feel uncomfortable or unsure about any step, it’s best to consult a professional plumber. With the right tools, knowledge, and a little patience, you can successfully fix your Kohler toilet and ensure it’s running efficiently once again. By taking action and resolving the problem, you’ll not only save water and money, but also contribute to a more sustainable and eco-friendly home.